Introduction
Building your own PC can seem daunting at first, but it’s a rewarding experience that can save you money, provide customization options, and give you a sense of satisfaction from creating a machine tailored to your specific needs. Not only that, but it’s also an opportunity to learn about the inner workings of a computer, which can be a valuable skill in today’s world.
In this guide, “How to Assemble Your Dream PC From Unboxing to Power On,” we will walk you through the process of building a PC, from unboxing the components to turning on the completed machine. To complete the build, you will need a few basic tools such as a Phillips head screwdriver, thermal paste, and an anti-static wrist strap to prevent damage to the components from static electricity. With this guide and the necessary tools, you will be able to build your dream PC with confidence.
How to Assemble Your Dream PC From Unboxing to Power On
Assembling your dream PC can be a fun and rewarding experience, but it can also be intimidating if you’re not sure where to start. The first step is to unbox all of your components and make sure that you have everything that you need. Next, you should carefully read the instructions that came with your motherboard, CPU, and other components to familiarize yourself with their layout and connections.
Once you have a general understanding of the assembly process, you can begin by installing the CPU, memory, and motherboard into the case. Make sure to properly align and secure all components.
After that, you can install the power supply, storage drives, and any additional components such as graphics card, Wi-Fi card, and sound card. Once all the components are installed, you can connect all the necessary cables such as power cables, data cables, and front panel connectors. Finally, power on the system and ensure that the fans, lights, and other indicators are working properly.
Unboxing and preparing the components
The first step in assembling your dream PC is to unbox and prepare the components. Carefully unbox each component and lay them out on a clean, flat surface. It’s important to take your time with this step and to handle each component with care to prevent any damage. Once you have all the components out of their boxes, you can start identifying each component.
Take note of the type and model of each component, and consult the manual or the manufacturer’s website if you have any questions. This step is critical as it will help you to familiarize yourself with the components, and also to ensure that you have all the necessary components before you start the assembly process. By properly preparing and identifying the components, you can ensure that the build process will go smoothly.
Installing the CPU
The next step in assembling your dream PC is to install the CPU. This step is critical as it is the “brain” of your computer, and proper installation is crucial for the computer to function properly. To install the CPU, locate the CPU socket on the motherboard and carefully insert the CPU, making sure it is properly aligned. Once the CPU is securely in place, you can then install the CPU Cooler.
The CPU Cooler is a device that helps to dissipate heat generated by the CPU and it’s important that you install it properly to ensure that your CPU doesn’t overheat. Before installing the CPU Cooler, it is recommended to apply thermal paste to the CPU.
Thermal paste is a thermal interface material that fills the microscopic air gaps between the CPU and the cooler, improving heat conduction and ensuring that the CPU doesn’t overheat. With these steps, you will have installed the CPU and the CPU Cooler correctly, and you can move on to the next step with confidence.
Installing RAM
The next step in assembling your dream PC is to install the RAM. Random Access Memory (RAM) is a type of computer memory that can be read and changed in any order, typically used to store working data and machine code. To install RAM, locate the RAM slots on the motherboard and carefully insert the RAM into the slot, making sure it is properly aligned.
The RAM should snap into place, and you should hear a clicking sound indicating that it is securely in place. It’s important to ensure that the RAM is properly aligned, as installing it the wrong way can damage the RAM or the motherboard.
Once the RAM is securely in place, you can then power on the computer and check that the system recognizes the RAM. With the RAM properly installed, your computer will have the ability to quickly access the data it needs, which will improve the overall performance of your computer.
Installing the motherboard
The next step in assembling your dream PC is to install the motherboard. The motherboard serves as the main circuit board in the computer and it connects the various components of the computer together. To install the motherboard, carefully place it inside the computer case, making sure to align it with the standoffs that are already in place.
Once it is in place, you can secure it with screws. After the motherboard is securely in place, you can then connect the power supply. The power supply unit (PSU) is responsible for providing power to all the components of the computer, it’s essential that you connect it correctly.
The power supply typically connects to the motherboard using a 20/24-pin ATX main power cable and a 4/8-pin ATX 12V power cable.
Additionally, you may also need to connect other cables such as SATA power cables for storage devices, and other cables for peripherals like fans. With the motherboard and power supply correctly installed, your computer will be able to properly distribute power to all the components, ensuring that they function correctly.
Connecting data cables
The next step in assembling your dream PC is to connect the data cables. These cables are responsible for connecting the various components of the computer together and allowing them to communicate with each other. To connect the data cables, you will need to connect the SATA cables for storage drives.
SATA cables are responsible for connecting storage devices such as hard drives and SSDs to the motherboard. These cables are typically connected to the SATA ports on the motherboard and the storage devices. It’s important to ensure that the cables are securely connected to prevent any data loss or corruption.
Additionally, you will also need to connect the front panel connectors. These connectors are responsible for connecting the front panel buttons and LEDs to the motherboard, allowing you to turn on and off the computer, as well as monitor the status of the computer.
These connectors are typically labeled on the motherboard, and the connectors on the front panel of the computer case will typically be labeled as well. It’s important to ensure that the connectors are securely connected, as if they are not, the computer may not turn on or the front panel buttons and LEDs may not function properly.
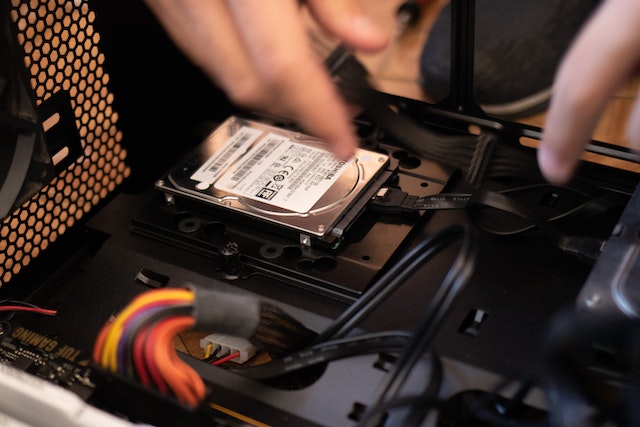
Installing storage drives
The next step in assembling your dream PC is to install the storage drives. Storage drives such as hard drives and SSDs are responsible for storing all the data on your computer, including the operating system, software, and personal files. To install the storage drives, you will need to locate the appropriate bays in the computer case.
These bays are typically located at the front of the case and are designed to hold storage drives. Carefully insert the storage drives into the bays, making sure that they are properly aligned. Once the storage drives are securely in place, you can then connect the data cables


